
What if the most stressful part of fixing your home isn’t the repair itself, but the uncertainty of what happens once the heavy equipment arrives? It’s natural to feel a sense of dread when you consider the noise, the vibrations, and the potential for interior damage. You want a stable house, but you don’t want the process to feel like a structural gamble. Understanding what to expect during foundation repair is the first step toward regaining your peace of mind.
We agree that structural work should be treated as a precise structural intervention rather than a disruptive construction project. This guide provides a clear, step-by-step breakdown of the diagnostic inspection, the installation of pier systems or wall braces, and the final restoration phase. You’ll learn how we stabilize your property. We also detail the specific measures taken to protect your landscaping and basement. Included is a practical preparation list to help you get your home ready for the crew. By the end of this article, you’ll have a predictable timeline and the reassurance that your home remains safe throughout every phase of the stabilization process.
Key Takeaways
- Map your home’s structural health using professional diagnostic data and moisture mapping before the repair crew arrives.
- Clear a three-to-five-foot workspace to facilitate a safe and efficient installation process for your structural specialists.
- Understand exactly what to expect during foundation repair in terms of industrial noise, vibration levels, and essential dust control measures.
- Identify the differences between interior I-beam stabilization and exterior piering to prepare for specific impacts on your basement or landscaping.
- Ensure long-term stability by verifying that restoration phases include proper soil compaction and thorough site cleanup.
The Diagnostic Phase: What Happens Before the Crew Arrives
Professional foundation repair begins with data, not guesswork. You shouldn’t expect a contractor to simply glance at a crack and offer a quote. Instead, a principled specialist conducts a comprehensive structural assessment to identify the root cause of the movement. This phase is critical because it determines the exact trajectory of the project and ensures the solution is permanent rather than a temporary fix.
During this initial stage, specialists use precision tools such as laser levels and moisture meters to map your home’s current state. These tools allow them to detect floor elevation changes as small as a fraction of an inch. They also measure hydrostatic pressure and moisture levels in the soil. This data-driven approach is essential for understanding structural settlement, which is the shifting of a building’s foundation due to soil compression or expansion. Knowing what to expect during foundation repair means recognizing that every recommendation is backed by these specific measurements.
The Structural Engineering Assessment
Specialists examine both interior and exterior wall planes during the assessment. They look for bowing, shearing, or stair-step cracking in the masonry. By checking the verticality of your walls, they identify the specific load-bearing points that require reinforcement. For homes experiencing significant sinking, soil analysis determines the necessary depth for Foundation Pier Systems. This ensures the piers reach stable, load-bearing strata or bedrock. If the issue involves inward wall movement, the specialist may recommend I-Beam Wall Braces or Foundation Wall Anchors tailored to your home’s unique structural needs.
Permitting and Utility Marking
Once the technical plan is finalized, the logistical preparation begins. Your contractor is responsible for securing all necessary local building permits. Structural work often requires city oversight to ensure the repairs meet current safety codes. Before any excavation starts, the crew must coordinate with “Call Before You Dig” (811) services. These technicians mark underground gas, water, and electrical lines to prevent utility strikes during the installation of piers or drainage systems. You should receive a written scope of work and a detailed site map during this time. These documents confirm the exact placement of equipment and the timeline for material delivery, providing a clear roadmap for the weeks ahead.
Preparing Your Home: A Homeowner’s Pre-Repair Checklist
Successful foundation stabilization depends on unobstructed access to the structural members being repaired. While the diagnostic phase identifies where the issues lie, the preparation phase ensures those areas are reachable and safe for the crew. Proactive preparation significantly reduces the risk of accidental damage to your personal property. Knowing what to expect during foundation repair involves understanding that your home will temporarily function as an active construction site.
A well-prepared site allows the crew to focus entirely on the structural integrity of your home. By clearing the workspace ahead of time, you minimize delays and ensure that specialized tools can be deployed exactly where they are needed most. This methodical approach protects your investment from the first day of production.
Interior Workspace Preparation
Interior structural work, such as installing I-Beam wall braces, requires a clear and safe perimeter. You should create a three-to-five-foot workspace along the affected basement or crawl space walls. This clearance is necessary for the crew to maneuver heavy steel beams and operate hydraulic equipment without obstruction.
Remove all wall hangings, shelving, and decorations from the walls being repaired. Structural repairs generate vibrations that can cause items on the opposite side of the wall to shift or fall. Move any stored boxes, furniture, or appliances toward the center of the room. We strongly recommend covering these items with plastic sheeting. Even with professional dust mitigation, structural work creates concrete dust that can settle on unprotected surfaces. Ensuring a clear path to the basement entry is also vital for the safe transport of materials.
Exterior and Landscaping Protection
When your repair plan includes foundation pier systems, the focus shifts to the exterior perimeter. You must identify the specific “dig zones” where the piers will be installed. If you have prized bushes, flowers, or small trees within three feet of the foundation, consider transplanting them before the crew arrives. While specialists work to minimize the footprint, a small area of the lawn may be temporarily impacted by soil displacement and heavy equipment.
Ensure the crew has access to a functional exterior water source and a dedicated electrical outlet. It is also your responsibility to mark private utility lines. While 811 services mark public gas and water lines, they often miss private irrigation systems, invisible dog fences, or exterior lighting wires. Marking these early prevents avoidable utility damage. If you are unsure about the specific access points needed for your project, you can consult with a structural specialist to review your site map and preparation requirements.
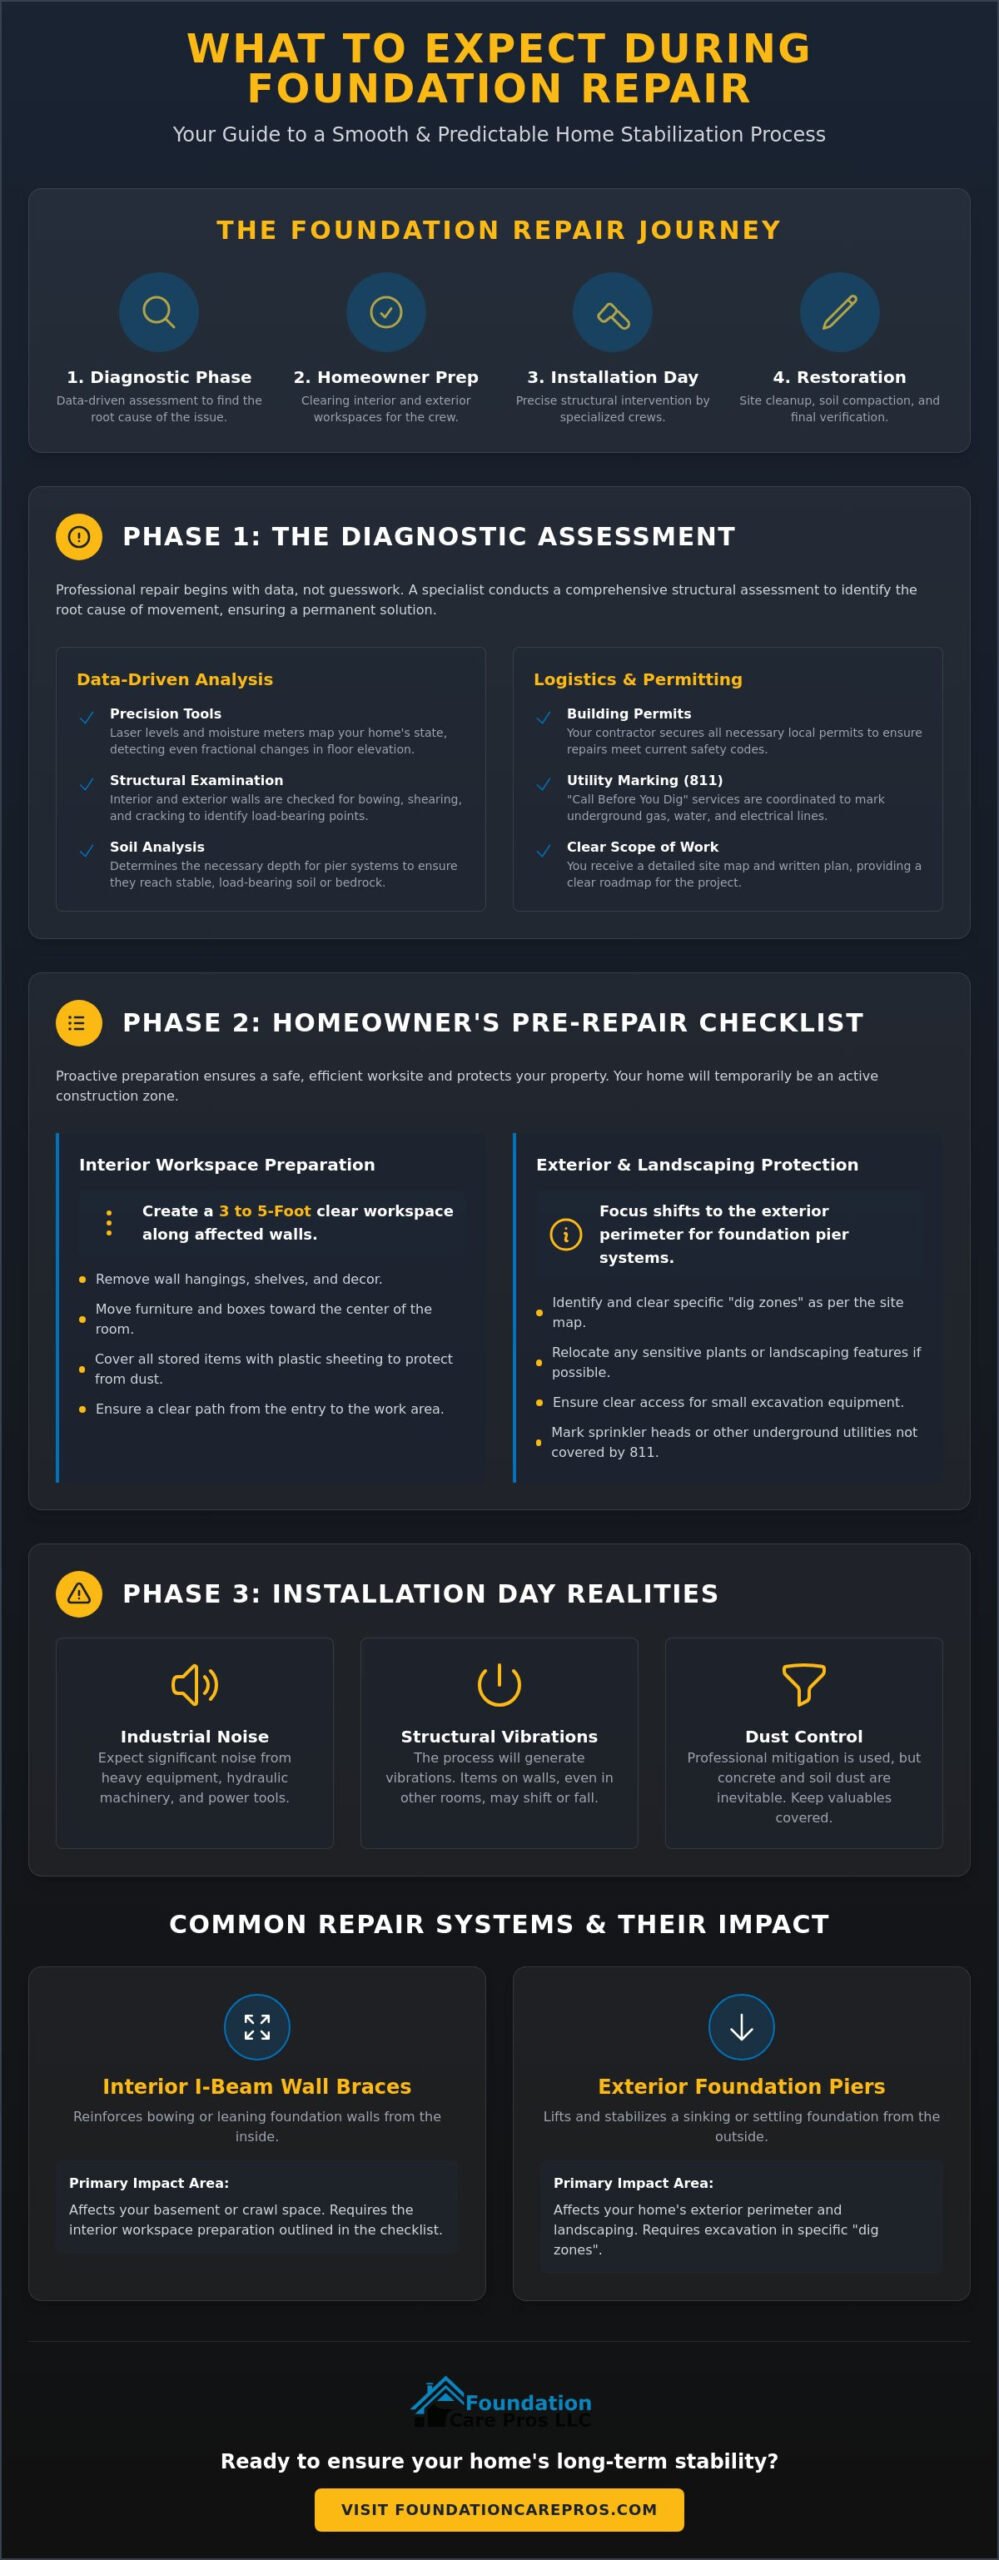
Installation Day: Managing Noise, Dust, and Vibrations
Installation day transforms your home into a temporary industrial site. While our previous sections focused on preparation, this phase is where the physical stabilization occurs. You should understand that foundation repair is a heavy mechanical process. It generates significant noise and physical vibrations that can be felt throughout the structure. Knowing what to expect during foundation repair helps you manage the sensory impact of the work as it happens.
Professional crews arrive with specialized equipment designed for structural intervention. Expect the sound of jackhammers if the project requires breaking through a concrete basement floor for pier or drainage installation. These high-decibel periods are necessary to access the footings or install Interior Basement Drainage Systems. Communication remains a priority during this phase. A lead foreman should provide a morning briefing to outline the day’s specific milestones and safety protocols. This transparency ensures you aren’t surprised by the shifting intensity of the work.
The Sensory Experience of Structural Repair
Active lifting or stabilizing often produces “popping” or “creaking” sounds. These noises are normal. They indicate that the structure is responding to the hydraulic pressure of the pier systems or the tensioning of wall anchors. If your project involves basement wall stabilization, drilling into masonry will create fine concrete dust. We mitigate this by using HEPA vacuums and plastic barriers, but some airborne particles are inevitable. If you work from home, we recommend planning for high-decibel activity during the morning hours. This is typically when the most intensive drilling and pier driving occurs.
Crew Dynamics and Site Safety
A typical crew consists of three to five specialized technicians. Each member has a dedicated role, from operating hydraulic pumps to monitoring laser levels for real-time elevation data. Safety is the primary concern during active installation. The basement or crawl space should remain off-limits to residents and pets while the crew is working. This prevents accidental injury and allows the technicians to move heavy components without distraction. Despite the heavy nature of the work, professional crews maintain a “clean site” policy. They use floor protection in high-traffic areas and conduct a thorough cleanup at the end of each shift to ensure your home remains habitable throughout the process.
Expectations for Specific Repair Systems
The solution dictates the scope of the project. Fixing moisture intrusion involves different milestones than addressing structural instability. Understanding what to expect during foundation repair requires looking at the specific hardware being installed. Some systems are purely interior, while others require significant exterior excavation. Timelines vary as well. A carbon fiber installation might take a single day, whereas a full crawl space project can span a week. Each method is a surgical intervention designed for a specific structural failure.
Installing I-Beam Wall Braces and Carbon Fiber
Interior stabilization focuses on reinforcing the vertical plane of your basement walls. When technicians install carbon fiber straps, they epoxy the high-tensile material directly to the masonry. This process is low-profile and requires no excavation. For more severe cases of basement wall stabilization, I-Beam Wall Braces are the standard. The crew anchors these steel beams to the floor joists above and the concrete slab below. This creates a rigid framework that prevents further inward movement. You should expect the presence of heavy steel and the use of high-torque fasteners during this phase. It’s a clean but loud process that prioritizes immediate lateral support.
Piering and Underpinning Expectations
Foundation Pier Systems address structural settlement by reaching deep into the earth. This process often requires exterior excavation. Expect to see 3×3-foot holes dug at specific intervals along your foundation. Once the footings are exposed, the crew drives steel piers down to stable soil or bedrock. The most critical moment is the “lift.” Technicians use hydraulic jacks to restore the foundation to its original elevation. They test each pier to verify it can support the specific load of your home before permanently attaching the brackets. This phase is methodical and relies on real-time data to ensure a level, permanent result.
Waterproofing and Encapsulation
Water management projects involve significant floor-level disruption. When installing interior basement drainage systems, the crew must trench the perimeter of the floor. This creates noise and dust as the concrete is removed to house the drainage tiles. In contrast, crawl space encapsulation focuses on sealing the environment with heavy-duty vapor barriers. You will see a total visual transformation as the area is lined with white, reinforced plastic. Sump pump installation concludes these projects. The crew will test the discharge lines and verify that backup battery systems are fully operational. If you are ready to secure your home’s future, you can schedule a structural evaluation to determine which system fits your needs.
Restoration and Long-Term Peace of Mind
Professional restoration signifies the transition from a construction zone back to a secure, stable home. Once the structural components are verified and the lifting or stabilization is complete, the crew shifts its focus to site recovery. This final phase is about validation and ensuring your property is left in a professional state. Understanding what to expect during foundation repair at this stage involves recognizing that the job isn’t finished until the workspace is restored and the documentation is in your hands.
A principled crew treats the restoration process with the same technical precision as the installation. They don’t just pack up and leave; they conduct a methodical cleanup and a final walkthrough with you. This ensures that every I-beam is secure, every pier is capped, and every area of the basement or yard is addressed. This phase provides the final layer of reassurance that your investment is protected for the long term.
The Final Cleanup and Backfill
The restoration process varies based on the specific systems installed. For interior projects, technicians patch the concrete around the base of I-Beam wall braces or drainage channels. They use high-strength mortar to ensure a seamless finish that matches the existing slab. All debris, protection materials, and plastic sheeting are removed from the basement or crawl space.
Exterior restoration involves backfilling the excavation holes used for piering. Specialists perform a “rough grade” backfill, which involves compacting the soil in layers to prevent future settlement. It is important to note that you should wait several weeks before performing final landscaping or laying sod. This allows the soil to settle naturally through a few rain cycles. The goal is to return the yard to a functional state while maintaining the integrity of the newly installed structural hardware.
Documentation and Warranty Review
The final milestone of the project is the delivery of your project documentation. You will receive a “Certificate of Completion” along with your structural warranty documents. These warranties are often transferable, which is a significant asset if you decide to sell your home in the future. A professional repair provides a “clean bill of health” that can be shared with home inspectors and potential buyers to prove the structure is stabilized.
During the final walkthrough, the foreman will review any maintenance requirements for your new systems. This includes:
- Testing the battery backup and discharge lines of your new sump pump.
- Reviewing the tensioning schedule for certain types of wall anchors if applicable.
- Inspecting the vapor barrier in an encapsulated crawl space for a perfect seal.
This transparent handover ensures you have total confidence in your home’s permanent stabilization. By following this expert-led process, you move from structural anxiety to long-term peace of mind.
Secure Your Home’s Structural Future
Stabilizing your property is a methodical process that prioritizes safety and long-term results. By following a clear diagnostic roadmap and preparing your workspace, you eliminate the uncertainty that often accompanies structural work. You now understand how specialized systems like I-Beam braces and foundation piers provide permanent support while professional crews maintain a clean and secure site. Understanding what to expect during foundation repair allows you to move forward with confidence rather than anxiety.
Foundation Care Pros is a locally owned and operated specialist that has served the community since 2004. As a proud Supportworks Network Member, we provide engineered solutions like permanent I-Beam and Piering systems to restore your home’s integrity. We focus on data-driven diagnostics to ensure every repair is tailored to your specific soil conditions and structural needs.
Take the first step toward a stable foundation today. Schedule Your Professional Foundation Diagnostic with Foundation Care Pros to receive a comprehensive assessment. You don’t have to face structural concerns alone; professional expertise is ready to secure your property for years to come.
Common Questions About the Foundation Repair Process
How long does the average foundation repair take?
Most residential foundation repairs are completed within one to three business days. Simple carbon fiber strap installations may take a single day; more complex projects involving full Foundation Pier Systems or crawl space encapsulation can take up to a week. Your specific project timeline is determined during the diagnostic phase and is influenced by soil conditions and the total number of structural members requiring stabilization.
Will foundation repair cause new cracks in my drywall?
Cosmetic drywall cracking is a common occurrence when a home is actively lifted or leveled. As the foundation is restored to its original elevation, the rigid interior finishes must adjust to the new structural alignment. While these cracks are visually concerning, they are superficial and indicate that the house is moving back toward a level state. We recommend waiting several weeks after the repair before patching drywall to ensure the structure has fully settled.
Do I need to leave my house during the repair process?
You do not need to vacate your home during the installation process. The work is concentrated in the basement, crawl space, or around the exterior perimeter. However, you should prepare for significant industrial noise and vibrations during work hours. Understanding what to expect during foundation repair means planning for these high-decibel periods, especially if you work from home or have sensitive pets.
Will the crew need access to my electricity and water?
Access to a functional exterior water source and a standard electrical outlet is required for most structural projects. The crew uses electricity to power hydraulic pumps and specialized drilling equipment. Water is often necessary for dust mitigation and cleaning tools during the restoration phase. If your exterior outlets or spigots are non-functional, please notify the foreman during the morning briefing so alternative arrangements can be made.
How messy is the basement after the crew leaves?
Your basement should be returned to a clean and orderly state following the final restoration. Professional crews use plastic sheeting to protect stored items and HEPA vacuums to capture concrete dust during drilling. While some fine dust is inevitable in an industrial workspace, the removal of all debris and equipment is a standard part of our clean site policy. We focus on leaving the area in a professional condition.
Can I finish my basement after I-Beams or piers are installed?
Basements can be finished or remodeled after the installation of I-Beam Wall Braces or pier systems. You can frame standard walls around the steel braces to hide them behind drywall. It is important to ensure that any new construction does not interfere with the structural integrity of the repair hardware. Always consult your structural specialist before beginning a remodel to confirm that your finishing plan maintains access to critical components like sump pumps.
What happens if the crew finds more damage during the dig?
If additional structural failures are discovered during excavation, the foreman will halt work to conduct a secondary assessment. Hidden issues, such as severely deteriorated footers or undisclosed utility lines, require a revised scope of work. We prioritize transparency and will provide a written explanation of any necessary adjustments to the repair plan. This ensures the final solution remains permanent and addresses the actual state of the foundation.
How soon can I replant my bushes after exterior foundation work?
Wait at least two to four weeks before replanting bushes or installing final landscaping over backfilled areas. The soil used to fill excavation holes for pier systems needs time to settle through natural rain cycles. Even with professional compaction, minor shifting is normal in the first month. Waiting ensures that your new plants remain at the correct depth and that the ground is stable enough to support permanent landscaping features.