
Soil shrinkage and swelling cause 52% of foundation cracks annually, often leading to the visible bowing of basement walls. You’re right to feel anxious when you see horizontal cracks or shifting blocks; your home’s structural integrity is literally under pressure. Professional i-beam wall braces installation resolves this by creating a rigid, tension-based support system. This method stops wall movement immediately and provides the long-term security your property requires.
You need a solution that prioritizes safety over superficial fixes. This article details the technical standards and installation processes required to stabilize your foundation permanently. We’ll walk through the engineering behind steel bracing, explain how it interacts with local soil conditions, and show you how to restore your basement’s safety. Understanding these professional standards will help you move from structural uncertainty to total home stabilization and increased property value.
Key Takeaways
- Identify how hydrostatic pressure forces foundation walls to bow and why steel supports provide the necessary counter-pressure for long-term safety.
- Master the technical standards of a professional i-beam wall braces installation, focusing on the critical floor-to-floor anchoring system that secures the home’s structure.
- Evaluate the performance differences between steel beams, carbon fiber straps, and wall anchors to select the most effective stabilization method for your specific soil conditions.
- Follow the step-by-step process of site preparation and beam customization that ensures every support is engineered for your basement’s precise height and load requirements.
- Learn how periodic adjustments to the integrated tensioning brackets can help move your foundation walls back toward their original position over time.
Understanding Bowed Walls and the Role of I-Beam Braces
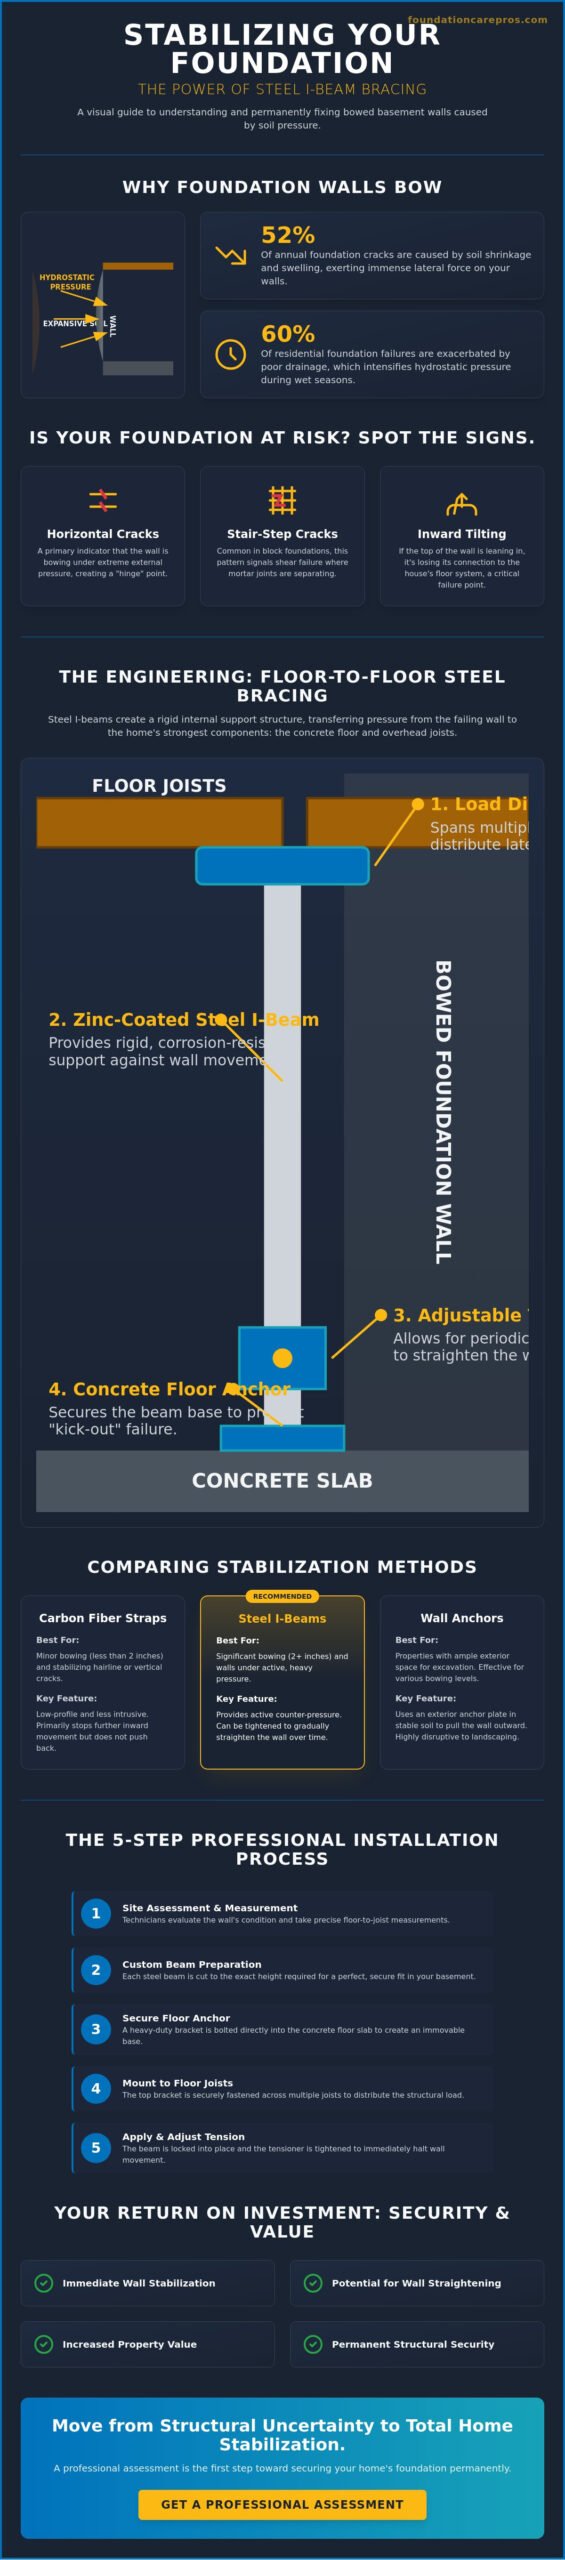
Foundation walls face constant environmental stress. When soil outside the home becomes saturated, it exerts massive lateral force against the concrete or masonry. I-beam wall braces are heavy duty steel supports designed to counteract this physical pressure. During a professional i-beam wall braces installation, technicians anchor vertical steel beams to the basement floor and the overhead floor joists. This creates a rigid framework that stops the wall from moving inward any further.
The primary objective of this system is total structural stabilization. While other methods might offer temporary relief, steel beams address the core mechanics of structural failure. They act as a permanent barrier between your living space and the shifting earth. Professionals recommend this approach when a wall has passed the “tipping point.” This is the specific moment where hairline cracks evolve into visible bowing or tilting. At this stage, the wall’s structural capacity is compromised, making a robust steel solution necessary to prevent total failure.
The Mechanics of Soil Pressure
Expansive clay soils are the leading cause of foundation distress in residential properties. Research shows that soil shrinkage and swelling are responsible for 52% of foundation cracks annually. When it rains, these clay particles absorb water and expand, significantly increasing the load on your basement walls. This is known as hydrostatic pressure. For a deeper look at the engineering involved, understanding soil pressure on foundation walls is essential to see how lateral forces can overwhelm standard masonry.
It’s vital to distinguish between vertical settlement and lateral movement. Vertical settlement occurs when the ground sinks beneath the foundation footing. Lateral movement happens when the soil pushes the wall inward toward the basement. Frost heaving makes this worse during winter months. As the ground freezes and expands, it exerts sudden, intense pressure that can snap a wall’s internal bonds in a single season. Poor drainage is a factor in 60% of residential foundation failures, which only increases the intensity of this lateral pressure.
Signs Your Foundation Needs Steel Reinforcement
You can often spot the need for i-beam wall braces installation by looking for specific cracking patterns. Horizontal cracks running through the middle of the wall indicate a “hinge” point where the wall is actively bowing under load. If the top of the wall is tilting inward near the sill plate, the structure is losing its connection to the floor system above. In block foundations, stair-step cracks in the mortar joints signal a shear failure. These signs prove the wall can no longer support the weight of the exterior soil on its own.
The Engineering Behind Floor-to-Floor Steel Bracing
Structural stabilization relies on the successful transfer of energy from a failing wall to a stable support system. The floor-to-floor concept is the foundation of this engineering approach. By anchoring the steel beam to both the concrete basement floor and the wooden joist system above, the i-beam wall braces installation creates a structural bridge. This bridge absorbs the lateral pressure pushing against the foundation and redirects it into the home’s strongest horizontal components. Rigid steel provides a level of resistance that flexible materials simply cannot match, making it the standard for walls with significant displacement.
The top bracket plays a sophisticated role in this assembly. It doesn’t just hold the beam in place; it distributes the load across multiple floor joists. This prevents a single joist from bearing the entire weight of the shifting wall, which could lead to floor heaving or structural cracking in the rooms above. At the base, a heavy-duty floor bolt is drilled into the concrete slab. This anchor is essential for preventing “kick-out,” a common failure where the bottom of a support beam slides inward because it isn’t properly resisted by the floor’s mass.
If you’re noticing signs of structural movement, a professional assessment can determine the exact placement needed for these supports. You can learn more about customized stabilization plans at foundationcarepros.com to ensure your home’s unique needs are met.
Zinc-Coated Steel vs. Raw Iron
Basements are naturally damp environments where high humidity and ground moisture are constant. Experts like Smart Property Care Ltd suggest that addressing these moisture issues is a key part of long-term property preservation. Using raw iron or untreated steel is a recipe for long-term failure because rust compromises structural integrity over time. Professional installations utilize zinc-coated or galvanized steel to ensure a lifetime of performance. This coating provides a chemical barrier that prevents oxidation, even when the beam is in direct contact with wet concrete or humid air. Using structural-grade steel ensures the material won’t bend or fatigue under the thousands of pounds of pressure exerted by expansive soils.
Load Distribution and Tension
A properly installed steel beam acts as a “second wall” for your home. It stands as a sentinel that absorbs external soil weight before it can further damage the masonry. The physics involves transferring lateral force into the home’s floor system safely and predictably. This is achieved through a specialized adjustment bolt at the top of the beam. Technicians use specific torque settings to apply initial tension. This tension doesn’t just stop the wall; it allows for the possibility of future straightening. Unlike passive systems, these beams can be tightened over time to gradually push the foundation back toward its original vertical position.
Comparing Stabilization Methods: Why Steel I-Beams Outperform Alternatives
Choosing the right repair method depends on the severity of the structural damage. While carbon fiber straps are effective for minor deflection, an i-beam wall braces installation is required once a wall has bowed more than two inches. Steel provides the rigid structural support needed to halt aggressive movement that fabric cannot resist. This is not just a patch; it’s a structural reinforcement that uses the home’s own weight to maintain stability.
Wall anchors are another common alternative, but they have significant limitations. Anchors require large yard spaces to bury steel plates in the soil. If your property has a deck, a neighbor’s fence, or dense clay that resists anchor driving, interior steel beams are the superior choice. They don’t require external excavation, making them a cleaner and more predictable solution. Additionally, steel beams offer a restorative potential that passive anchors often lack. Because the beams are tensioned against the floor joists, they can be adjusted over time to actually push the wall back toward its original position. Passive systems only stop the movement; they don’t reverse it.
Many homeowners worry about the look of steel in their basement. You can easily frame a stud wall around the beams to create a finished space. This hides the structural work while maintaining the safety of the foundation. It’s a practical way to protect your home’s value without sacrificing the utility of your basement.
When to Choose I-Beams Over Carbon Fiber
The “2-inch rule” is a standard diagnostic threshold in foundation engineering. If the wall’s mid-section has moved inward by more than two inches, the structural integrity of the masonry is too compromised for surface-level straps. Carbon fiber is excellent for tension, but it lacks the sheer rigidity needed to stabilize a wall that has already lost its vertical plane. Block walls are particularly susceptible to shearing at the mortar joints. Steel beams provide a physical stop that spans the entire height of the wall, ensuring the blocks cannot shift further. While straps might offer lower initial costs, the long-term permanence of steel provides a much higher cost-to-value ratio for severe cases.
I-Beams vs. Total Wall Replacement
Replacing a foundation wall is a massive undertaking. It involves excavating the perimeter of your home, supporting the house on jacks, and rebuilding the masonry from the footer up. This process is often 50-70% more expensive than a professional i-beam wall braces installation. Beyond the cost, total replacement disturbs the compacted soil around your home. This disturbance can lead to new drainage issues or future settlement problems as the backfilled earth settles. Stabilization with steel beams provides a non-invasive, permanent structural fix. It addresses the failure without the risks and property destruction associated with major excavation.
The Step-by-Step Professional Installation Process
Execution is the most critical phase of foundation stabilization. A professional i-beam wall braces installation requires a methodical approach that prioritizes structural accuracy and site safety. Unlike superficial repairs, this process integrates the steel supports into the existing framework of your home. Each step is designed to ensure that the lateral pressure from the soil is met with an equal and opposite force from the steel beams. This transition from a failing wall to a stabilized structure happens systematically through precise measurement and heavy duty anchoring.
The process begins with beam customization. Technicians measure the exact height of the basement wall from the concrete floor to the bottom of the floor joists. Each steel beam is then cut on-site to ensure a tight, custom fit. Once the materials are ready, the team notches the concrete floor at the base of the wall. This notch allows the beam to sit below the floor line, creating a “pocket” that prevents the base of the beam from sliding inward. This is a more secure method than simply bolting the beam to the surface of the slab.
If you suspect your foundation requires this level of intervention, you can schedule a professional site evaluation at foundationcarepros.com to determine the best placement for these supports.
Preparing the Foundation for Success
Preparation defines the longevity of the repair. Technicians start by verifying the location of utility lines, electrical conduits, and plumbing pipes before any drilling occurs. Clearing the workspace is essential to protect your property and provide the team with the necessary leverage for heavy lifting. The wall surface is cleaned of debris or loose masonry to ensure the steel sits flush against the foundation. Professionals calculate the exact spacing for the beams based on the severity of the bow and the height of the wall. In most residential basements, beams are installed every 4 to 5 feet to ensure the load is distributed evenly across the entire structural plane.
The Precision of the Top Bracket System
The connection to the floor joists is where the system gains its strength. A high-quality i-beam wall braces installation uses a top bracket system that spans at least two floor joists. This is a critical engineering detail; anchoring to a single joist can cause the wood to split or rotate under the pressure of the wall. By bridging two joists, the bracket spreads the load across a larger area of the home’s wood frame. The “long-bolt” system is then threaded through the bracket and attached to the beam. This bolt is used for the final tensioning, where the beam is pulled tight against the wall. Technicians use levels to ensure every beam is perfectly plumb. This vertical alignment is mandatory for optimal weight distribution and ensures the system can be tightened safely in the future.
Long-Term Structural Integrity: Maintenance and Results
The completion of a professional i-beam wall braces installation marks the beginning of a dynamic stabilization process. Unlike passive systems that only hold a wall in its current state, steel beams provide a mechanism for restorative improvement. These supports utilize the home’s own structural weight to maintain a permanent barrier against external soil pressure. This proactive approach turns a structural necessity into a reliable tool for preserving your property’s safety and market value over the long term.
Monitoring the foundation in the months following the installation is a critical part of the maintenance cycle. You’ll want to observe the behavior of existing cracks and ensure the beams remain plumb as the seasons change. It’s often beneficial to integrate an Interior Basement Drainage System and Sump Pump Installation alongside your steel beams. Removing hydrostatic pressure at the source reduces the load the beams must carry, creating a comprehensive solution for a dry, stable basement. By managing both the structural support and the groundwater, you ensure the foundation remains secure regardless of weather patterns.
The Tightening Schedule
Straightening a foundation wall is a gradual process that requires patience and precision. The first adjustment typically occurs after a significant dry season. Research indicates that soil shrinkage and swelling are responsible for 52% of foundation cracks annually; during dry periods, the soil pulls away from the foundation, reducing lateral pressure. This is the optimal window for a technician to tighten the adjustment bolts. The goal is always structural stability rather than a perfectly flat aesthetic. Only a professional should perform these torque adjustments. Over-tightening can lead to wood splitting in the floor joists or unintended stress on the masonry blocks.
Securing Your Investment
Professional foundation repairs are a primary focus for home inspectors during a property sale. A documented i-beam wall braces installation proves to potential buyers that the home’s structural issues have been addressed with engineered solutions. This transparency often prevents the foundation from becoming a point of contention during price negotiations. A transferable lifetime warranty on the steel system provides an additional layer of security for future owners. By choosing a permanent, high-grade steel solution, you protect your home’s equity and ensure it remains a safe investment for decades to come.
Take the first step toward permanent stability. Schedule a professional structural assessment with Foundation Care Pros today to secure your home’s foundation.
Restore Your Home’s Structural Integrity
You now understand how lateral soil pressure compromises masonry and why steel reinforcement is the standard for permanent stabilization. A professional i-beam wall braces installation provides the necessary counter-force to halt inward movement and protect your home’s framework. By utilizing the floor-to-floor anchoring method, you transform a vulnerable basement into a secure, reliable foundation that stands up to environmental stress.
At Foundation Care Pros, we provide methodical, evidence-based structural repairs that prioritize long-term safety. Our solutions include transferable lifetime structural warranties, ensuring your investment remains protected for as long as the house stands. This commitment to quality ensures that your property value is preserved and your living space remains safe from structural failure.
Secure Your Home’s Foundation with Professional I-Beam Installation. Taking action today prevents further deterioration and restores your peace of mind. Your home deserves the stability of professional engineering and a permanent fix.
Frequently Asked Questions
How many I-beams will my basement wall need?
Most residential basement walls require a beam every 4 to 5 feet to distribute lateral pressure effectively. The exact number depends on the total length of the bowing wall and the height of the foundation. A standard 40 foot wall usually needs between 8 and 10 beams for a secure i-beam wall braces installation. This spacing ensures the structural load is managed without overstressing any single section of the masonry.
Can I-beam wall braces actually straighten my bowing wall?
Steel beams can move a wall back toward its original vertical position through periodic tightening of the adjustment bolts. This process is most effective during dry seasons when soil pressure naturally decreases. While the primary goal is stabilization, the tension based system allows for gradual restoration over several years. Technicians use specific torque settings to ensure this movement happens safely without damaging the floor joists or the wall itself.
Will installing steel beams take up a lot of space in my basement?
You can preserve the majority of your usable basement space because I-beam braces sit flush against the foundation wall. These supports typically extend approximately 4 inches into the room, which is a lower profile than many alternative methods. Because they are vertical supports anchored at the top and bottom, they don’t require large protruding hardware. This makes them a practical choice for homeowners who plan to utilize their basement.
How long does the installation of I-beam wall braces take?
A professional i-beam wall braces installation is typically completed in one to two days for a standard residential basement. The timeline varies based on the number of beams required and the accessibility of the workspace. Because this is an interior repair that doesn’t involve heavy yard excavation, the process is efficient and causes minimal disruption to your daily routine. Once the beams are tensioned, the stabilization is immediate.
Is it better to use wall anchors or I-beam braces?
Steel beams are often the superior choice when yard space is limited or soil density prevents the use of anchors. Anchors require at least 10 feet of cleared space outside the home to bury plates in the earth. If you have decks, landscaping, or property lines close to the house, interior beams provide a more reliable and less invasive solution. Beams also offer better restorative potential for walls with significant bowing.
Do I-beam braces require maintenance after they are installed?
Annual inspections of the tension settings are the only maintenance required for steel beams. These periodic adjustments ensure the system continues to provide optimal support as the soil outside expands and contracts. If you notice new cracks or changes in the wall’s position, a technician can adjust the torque on the top brackets. This proactive care ensures the long term structural integrity of the repair.
Can I finish my basement after I-beam braces are installed?
Finishing your basement is entirely possible after installation by framing a standard 2×4 or 2×6 stud wall in front of the beams. This allows you to install drywall and insulation while keeping the structural supports accessible behind the wall. It’s a common practice that hides the hardware without compromising the foundation’s safety. Just ensure your contractor leaves access points for future maintenance of the adjustment bolts at the top of each beam.
What happens if I delay the installation of wall braces?
Total wall collapse is the primary risk if you delay the installation of structural reinforcement. Delaying repairs allows lateral soil pressure to continue pushing against the foundation, which eventually overwhelms the masonry. This results in more expensive repairs, such as total wall replacement or foundation piering. Addressing the issue early prevents these catastrophic failures and protects your home’s resale value.